19 October 2011

Christmas Cards

Hi :-)

While you wait for me to get round to finishing off and taking photos of my paint fusion projects from Port Sunlight, I thought I’d post a couple of Christmas cards that I’ve done for my “for sale” box.

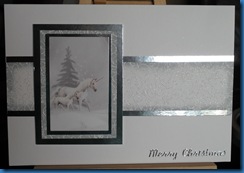
The first is one of my most favourite toppers from Hunkydory.  I’ve always loved unicorns and have a small collection of unicorn items I’ve collected over the years – you wouldn’t believe how hard it can be to find really nice looking unicorns that don’t just look like a horse with a horn stuck on it’s head.

Unicorn landscape web

I matted and layered the topper onto a stamped background and onto silver mirri card.  The stamped background uses my favourite snowflake background stamp from Creative Expressions (OASIS1200K).  I stamped a full A4 sheet using Versamark and embossed with Winter Wonderland embossing powder by Stampendous.  It’s a gorgeous powder and you will see both the stamp and powder turn up a fair bit in my winter cards.  The stamped backgrounds have also been coloured and edged with Weathered Wood Distress Ink.  The greeting is a peel off as my printers refuse to take card even though they should.

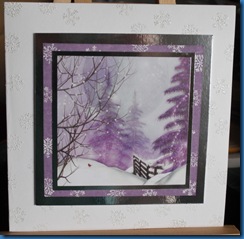
The second card is a lovely landscape scene, also by Hunkydory.  Both card toppers have touches of glitter on too.

Winter Scene web

This second card has individual tiny snowflakes stamped all over both the card blank and the background mat, then embossed with – you’ve guessed it – Winter Wonderland embossing powder.  The mat has been coloured using Dusty Concord Distress Ink to make the snowflakes stand out.  Silver mirri card has again been used as layers.

Well I think I’ve gone on long enough.  I hope you like the cards, feel free to add any comments as I would love to know what you think of my cards.

Happy crafting and take care

Kate x
15 October 2011

Just One More Sleep!

I am so looking forward to a full day of Christmas paint fusion tomorrow at Sheena Douglass' workshop at Port Sunlight!

Everything's in my craft trolley waiting for tomorrow, apart from my lunch and drinks of course, they're in the fridge.

I've been bad about fusioning over the last few weeks, though I have a couple of cards with fusion in the background.  I'll be putting up pics over the next couple of weeks - as usual, once I've actually taken the photos :-)

No matter what I think of my workshop projects (which in themselves will be fab, it's just my interpretation I'm not so sure about lol) I will post pics of my attempts, so feel free to criticise - as always I am open to any comments good or bad.

Well, time for me to finish off the last few bits and pieces before heading up for a good night's sleep.  I'm usuing the "Christmas principle" tonight - the sooner I go to bed the sooner tomorrow will arrive :-)

Have a great night yourselves and I hope you're enjoying your weekend whatever you're doing.

Happy crafting
Kate x

14 October 2011

Another post already?

Well, can you believe I’m posting again without waiting for Christmas to arrive?  Maybe I should have warned you to sit down first *grins*

I thought I’d show you a couple of birthday cards I’ve done which will be going into a “for sale” box I’m doing for someone.

They’re both from the same decoupage pad from Dovecraft designed by Helz Cuppleditch called Cookie’s Birthday.  The pads include 4 sheets of decoupage, 2 each of 2 designs and 2 each of 4 coordinating backing papers.  The decoupage and 2 of the backing papers are glittered, the 2 unglittered (hmmm is that a word?) papers are double sided.

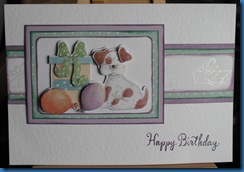
The first is Cookie’s Little Extras

Dog Parcel web

I’ve edged the layers with Distress Inks and embossed a Woodware parcel stamp with a clear holographic powder.  The greeting is from Hero Arts stamped with Dusty Concord and also embossed with clear holographic.

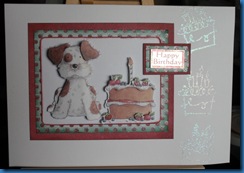
The second is Cookie with his birthday cake

Dog Cake web

I’ve made it in a similar way to the card above, again using Distress Inks, a Woodware parcel stamp and a small Dufex greeting.  I think the glittering on the decoupage shows more clearly in this photo, as does the clear holographic embossing.

Well that’s it from me for today, happy crafting

Kate x

7 October 2011

Dinosaur Boy

Well, doesn’t time fly by quickly, I can’t believe how much time has gone by since I last posted.  So much for promising myself I would try and post at least on a weekly basis.  I will try harder.

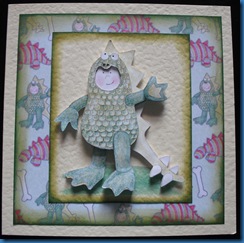
Anyway, I made a family card last week for a 4 year old boy.  I used a decoupage sheet I’ve had for a long time but never used by Paper Nation called Dinosaur Boy which came with a matching backing paper.  I inked the edges with Distress Inks: Pine Needles and Peeled Paint.

Dinosaur Boy Cropped

Please ignore the terrible “grounding” wash I tried to do underneath him, it just went terribly wrong and have made a mental note not to do it before placing the decoupage next time :-)

Hopefully your crafting is going better than mine!

Have fun and take care

Kate x

9 August 2011

Sheena’s new stamps and blog candy!

Am so excited this week.  Sheena Douglass has her new Christmas paint fusion stamps as the pick of the week on Create and Craft from Friday.  There are 6 new stamp plates and a Christmas DVD and I am so looking forward to seeing them.  

To celebrate the launch, Sheena is offering some blog candy and it's not only going to be the FULL set of stamp plates, but the DVD as well plus an original piece by Sheena herself!  How great is that???

To be in with a chance of winning, all you have to do is put this news on a blog or social networking site and link to Sheena's blog.  Of course in my case it won't be getting the news out very far as my blog is so new and I don't get many visitors (can you hear the violins playing gently in the background?) but what the heck, I want those prizes!

To see a sneaky peak of her new stamps click here  (please let this work, never done a link before! lol)

Have a great crafting week

Kate x

25 July 2011

Busy weekend tinged with sadness

Just a quick post today.  It's been a busy weekend with the blackcurrents starting to ripen nicely.  Making pies and crumbles for the freezer, also freezing the fruit itself to be made into ice cream at a later date.  This will be the pattern for the next week or so as we've decided to pick the fruit gradually to spread the work more evenly.  I may even have a try at jam making this year...... just don't hold your breath!

However, this weekend has also been edged with sadness as we lost our cat, Oliver, of 11 years.  Hubby buried him this morning (Sunday, I know it's technically Monday but the next day doesn't start for me until I've been to bed).  He will be missed (Oliver that is, not hubby!) but hopefully he is happily chasing the mice in cat Heaven.

Hope it's been a better weekend for yourselves
Have a good week
Kate

15 July 2011

Paint Fusion first attempts

Well, I know it’s been a while since I said I’d post pics of my first Paint Fusion pieces but here they are in all their imperfect glory :-)

The first is a mount board lavender tag.  It wasn’t looking too bad until I decided to extend the flowers further down the stem, I really shouldn’t try and think lol.  It also needed to be stamped lower down too, but overall I’m happy with it.

Lavender Tag web

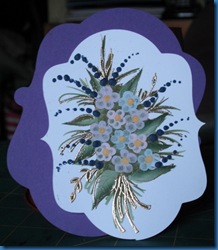
The second was a cotton bud bouquet topper on card.  This was fun though I need to practice my small leaves and the dark blue flowers needed to be more delicately done – unfortunately I’m not known for being delicate!  I need to finish this piece yet, but will probably use it on a card sometime.

Cotton Bud Bouquet web

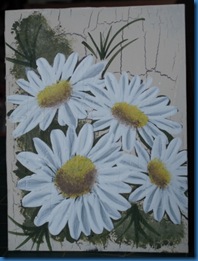
After lunch we did a daisy bouquet on mount board.  This was one of my favourites to do and when I finished it couldn’t believe that it was my own work!  Looking at it afterwards I can see areas that need much improvement and it needs finishing off too.  I loved the crackling technique too and I just know I’m going to love watching the crackles appear as much as I still enjoy watching embossing powder melt after all these years :-)

 Daisies web

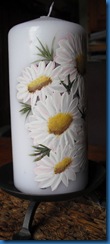
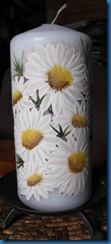
The last 3 pics are the candle we stamped and painted in the afternoon.  Stamping onto the candle isn’t easy, it’s like stamping on acetate but as the outline is going to be pretty much painted over any mistakes are covered :-)

Daisy Candle Left web Daisy Candle Front web Daisy Candle Right web

I hope you’ve enjoyed the peek at my first attempts.  Feel free to leave any comments, including critiques – after all we all learn best by our mistakes.

Have a great Friday, thanks for stopping by

Kate

31 May 2011

Paint Fusion workshop

Had a fabulous time on Sheena Douglass' Paint Fusion workshop at Topaz on Saturday.  We completed 4 projects, including fusioning a candle!  Hubby treated me to the first 6 stamp plates and DVD at the beginning of the month for my birthday but I have yet to even cut them out, let alone play with them.

However, while my projects are far from perfect, I was so impressed with how they turned out.  By no stretch of the imagination can I be called an artist, but even hubby can see potential in my work and as the workshop was also a birthday treat he felt it was money well spent :-)

I will post pics of my very imperfect work once I have actually taken some!

I would also like to thank Dawn and her staff for helping make the day so enjoyable, especially the lovely lady who sorted out drinks and cake (so sorry, but I can't remember your name *hangs head in shame*)  Can't wait until Sheena has the time to do more workshops in the Northwest :-)

Happy crafting  xx

9 May 2011

First card pic posting

I thought I would try to post my first card pic and what better than the card I made for my latest great nephew?  So, here goes, fingers crossed!
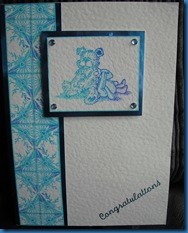
Noah Birth Card April 2011 Cropped
The stamps I’ve used are ones I’ve had for years but haven’t used much recently.
The border is a Clarity corner stamp, my favourtie of their corner stamps I own.
The teddy is from the Stick and Stamp range from Rubbadubbadoo – I don’t know if it’s still available, from a set called A Star Is Born.
I used a Kaleidacolour ink pad, Blue Breeze, for the colour.
Dots of Butterfly Trails Diamond Sparkle glitter from Hunkydory, applied using the Quickie glue pen to the border.
As neither of my printers seem to like card of any thickness, I’ve used a peel off greeting coloured with a Stazon Blue Teal ink pad.
Blue gems from my general stash, got to have a good selection of gems handy don’t we?
The base card is A5 made by folding an A4 sheet of cream hammer card, matting is with Hunkydory blue mirri - my absolute favourite shade of blue, but then again I may be biased as my blue also happens to be my favourite colour :-)
I hope you like it and appreciate all comments, after all nothing beats a fresh eye on things does it?
Kate x

30 April 2011

New arrival

My niece had a little boy today making me a great auntie again!  I've only seen a photo but he looks gorgeous.  Just had to tell the tiny bit of the world that currently reads this (that'll be me then lol)  In spite of it being a planned c-section for yesterday, it was delayed until this afternoon.  I can't wait to see him.  Mum and baby doing well :-)

6 April 2011

Learning slowly but surely

It's a beautiful sunny spring morning here and in spite of the house being in chaos have decided to play with blogger and finally add a new post.  Sometimes there doesn't seem to be enough hours in the day but there comes a moment when you realise you just have to make the time.  So please bear with me while I play and learn, you never know I might even post a pic next time :-)

25 January 2011

UNDER CONSTRUCTION

Hi My name is Kate and I'm trying to make sense out of Blogger at the moment. My blog will be about a number of things, mostly my crafting which i enjoy and spend a lot of my time doing.

Please call back and see how the Blog is progressing, hope to see you soon:-)